
TL;DR
Moving your noisy rig into a closet can make your workspace silent, but it’s not a magic fix. Proper ventilation, sealing gaps, and strategic placement of acoustic treatments are key to keeping it cool and quiet. Foam alone won’t cut it—think of your closet as a heat trap with potential for great soundproofing if you handle airflow correctly.
Ever thought about hiding your noisy AI workstation in a closet? It’s a game-changer. Instead of fighting the racket with thick foam, you can simply put the rig somewhere out of sight—and earshot. But here’s the catch: the closet needs to breathe, or you’ll cook your hardware.
This article breaks down the real tricks behind making your closet a quiet, cool sanctuary for your high-power AI setup. We’ll cover placement, sealing, airflow, and the best ways to treat the space—so you get silence without overheating.
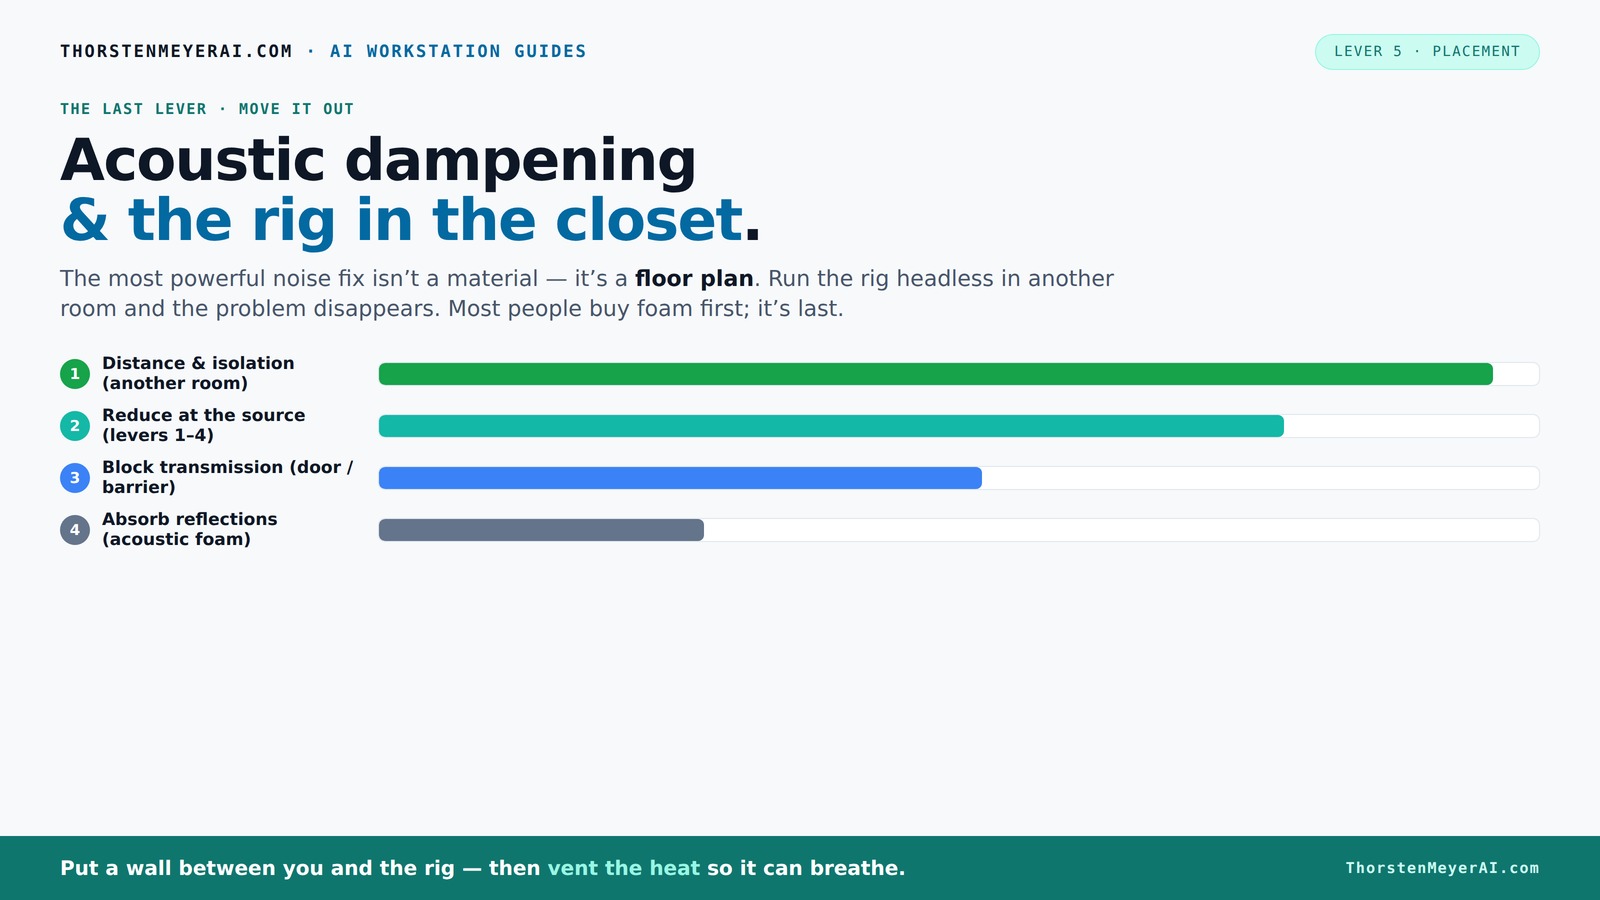
Acoustic dampening
& the rig in the closet.
The most powerful noise fix isn’t a material — it’s a floor plan. A rig you can’t hear because it’s in another room beats any amount of foam. Tap the approaches in Part 1 to see what actually works.
(another room)
(levers 1–4)
(door / barrier)
(acoustic foam)
Contain the noise, not the heat
Key Takeaways
- Moving your rig into another room or closet can cut noise dramatically without spending a dime on foam.
- Proper ventilation is non-negotiable; sealed closets trap heat, risking hardware damage and fan noise.
- Treat about 20–40% of the interior surfaces—focusing on reflection points and corners—for effective sound control.
- Sealing gaps around the door and vents prevents sound leaks, making your closet almost soundproof.
- Combine acoustic treatment with strategic mic placement and reflection filters for the clearest recordings.

Focusound 52 Pack Acoustic Foam Panels 1" x 12" x 12" Sound Proof Foam Panles Soundproofing Noise Cancelling Wedge Panels for Home Office Recoding Studio with 300PCS Double-Side Adhesive
Soundproofing - Acoustic foam panels triangular grooves structure for better noise absorption, helps to reduce and absorb unwanted...
As an affiliate, we earn on qualifying purchases.
As an affiliate, we earn on qualifying purchases.
Why Moving Your Rig Is the Best Noise Solution (And It’s Easier Than You Think)
The simplest way to cut noise is to put the rig somewhere else. A different room, a basement, or even a closet. When you aren’t next to the machine, it doesn’t matter how loud it roars.
Imagine you’re running a GPU that hits 80°C and spins fans at full blast. If that setup is in another room, you barely hear it. Your laptop stays silent, and the noise is gone. Plus, it’s a quick fix—no foam or soundproofing needed.
In practice, this means running a long Ethernet cable or Wi-Fi. Then, accessing your rig remotely becomes second nature. The key: ventilation and airflow are your new best friends.

CORSAIR 4000D RS ARGB Frame Modular Mid-Tower ATX PC Case, High Airflow, 3X Pre-Installed RS Fans, InfiniRail™ Mounting System, ASUS BTF, MSI Zero, Gigabyte Stealth, Black
FRAME Modular Case System – The revolutionary FRAME system gives new meaning to the word customization. Want to...
As an affiliate, we earn on qualifying purchases.
As an affiliate, we earn on qualifying purchases.
The "Rig in the Closet" Setup — How to Keep It Cool Without Cooking It
Putting a hot, high-load machine in a closet sounds perfect—quiet and out of sight. But heat is the enemy. Without proper airflow, your GPU’s exhaust will bounce around, raising the temperature and causing fans to scream. For more on managing airflow, see this airflow guide.
For a closet setup, ventilation is king. Add passive vents or, better yet, a quiet exhaust fan that pulls hot air out. This keeps the inside cool enough to prevent throttling. You can even use a small duct system connected to an external vent.
Serious solutions include soundproof cabinets with ducted airflow and thermostats, which keep noise down while dissipating heat efficiently. Check out this guide for detailed airflow tips.

Easy Cloud Computer Fan with AC Plug, 120mm Variable Speed Axial Muffin PC Fan with Controller 120V 110V 220V Small 12V Case Cooling for PC Server Cabinet DVR TV Router Receiver Xbox Greenhouse
【Speed Controllable】Easy Cloud axial fan 120v allows you to freely adjust the computer cooling fan speed according to...
As an affiliate, we earn on qualifying purchases.
As an affiliate, we earn on qualifying purchases.
Acoustic Treatment in a Closet: Do’s and Don’ts for Soundproofing
Acoustic dampening is about controlling how sound bounces inside your closet. But it’s not just about slapping foam everywhere. The goal is to reduce reflections and echoes, not just block noise from leaking out.
Start with the first reflection points—side walls, ceiling above your mic, and behind your speakers. Use broadband absorbers like foam panels or bass traps in corners to tame low frequencies. Heavy blankets and rugs can soak up sound reflections inexpensively. Learn more about acoustic treatment at this site.
However, don’t rely solely on foam. According to recent advice, treating about 20–40% of surfaces often hits the sweet spot. Over-treating can deaden the space and make it sound unnatural.
Remember, soundproofing the door and sealing gaps is just as crucial. Use weatherstripping, door sweeps, or acoustic seals to prevent leakage.

118” Wedge-Shape Foam Window Weather Stripping Door Seal Strip,Soundproofing Frame Winter Insulation Tape for Exterior Front Door,Noise Cancelling Window Inserts,Door Gap Filler Light Blocker,White
Upgraded Wedge Design: This window draft stopper features an upgraded wedge design, tapering from 5/32" to 11/32" (0.16"–0.35")...
As an affiliate, we earn on qualifying purchases.
As an affiliate, we earn on qualifying purchases.
Where To Place Acoustic Panels for Maximum Effect
Place acoustic panels at the points where sound reflects before reaching your ears. That’s usually the first reflection points on side walls, ceiling, and behind the mic. Use a mirror trick: have someone move a mirror along the wall while you sit at your setup. When you see the speaker or mic reflected, that’s where to put panels.
For a closet, focus on side walls and ceiling. Bass traps in corners help control low-frequency buildup, which small spaces tend to amplify. Smart placement reduces echo and makes your recordings clearer.
Here's a quick checklist:
- Identify reflection points with a mirror or laser pointer
- Cover those spots with foam or absorption panels
- Seal gaps around the door and vents
- Add bass traps in corners for low-end control
This targeted approach saves money and improves sound quality fast.
Bass Traps and Low-Frequency Control in Small Spaces
Bass traps are essential because small closets tend to amplify low-end resonance, leading to boomy, muddy recordings. They sit in corners where low frequencies tend to build up. For detailed tips, visit this resource.
For a closet, a couple of foam bass traps or DIY options like dense rockwool cut into wedges can make a big difference. Properly placed, they prevent standing waves and reduce muddiness.
Research shows that treating just 20% of the room’s surface with bass traps can dramatically improve clarity. In a tiny space, even a few wedges can cut down low-frequency chaos.
Sealing the Gaps: The Hidden Weak Point in Closet Soundproofing
Gaps and cracks are the Achilles' heel of closet soundproofing. A tiny crack around the door or vent can leak sound like a whistle. Sealing these is cheap and easy but often overlooked. For more on sealing techniques, see this guide.
Use weatherstripping or acoustic door seals. Cover any holes or vents with acoustic blankets or foam panels. Even a thick blanket over the door can cut down on leakage.
For an extra layer, hang a heavy curtain or blanket over the door. These simple tricks can reduce sound escape by 10–20 dB, making your closet almost soundproof.
Choosing the Right Microphone and Placement Inside the Closet
Microphone choice and placement are just as important as room treatment. In a small space, a dynamic mic or a cardioid condenser helps reject ambient noise. Position it close to the source—about 6-12 inches away—to minimize reflections. For more on microphone placement, visit this site.
Use reflection filters or shields to further block unwanted sound. Place yourself near a corner or against a wall for reduced room sound, but avoid deadening the room entirely.
Remember, the goal is to get a clear vocal without picking up every echo in the closet. Experiment with mic angles and distance for best results.
When a Reflection Filter Is Enough (And When It Isn’t)
A reflection filter can be a quick fix for reducing room reflections around your mic. It’s a portable, affordable solution that works well in small spaces.
But it isn’t a substitute for proper room treatment. In a closet, a filter helps tame immediate reflections but won’t address low-frequency buildup or sound leakage.
Use a reflection filter as part of a layered approach: combine it with sealing gaps, placing panels at reflection points, and controlling low-end with bass traps. That way, you get a cleaner, more professional sound.
Frequently Asked Questions
Is a closet actually good for recording vocals?
Yes, if you treat it properly. Small, enclosed spaces reduce reflections and echo, leading to cleaner recordings. Just remember to seal gaps, add absorption at reflection points, and control low frequencies with bass traps.
What’s the main difference between acoustic dampening, soundproofing, and acoustic treatment?
Acoustic dampening reduces echoes and reflections inside a space. Soundproofing blocks noise from leaving or entering. Acoustic treatment is about balancing both—controlling sound reflections and leakage for better sound quality and quieter environments.
Where should I place acoustic panels inside a closet?
Focus on reflection points—side walls, ceiling, and behind your mic. Use a mirror trick to find these spots. Add bass traps in corners, and seal gaps around the door for best results.
Do bass traps help in a small closet?
Absolutely. Bass traps prevent low-frequency buildup, which can cause muddy recordings. Even a few wedges placed in corners make a noticeable difference in clarity.
How do I prevent sound from leaking through the closet door?
Seal gaps with weatherstripping, hang blankets or acoustic panels, and use a door sweep. These simple steps cut down leakage significantly, making your closet much more soundproof.
Conclusion
Placing your AI rig in a closet isn’t just a space-saving trick—it can be a game-changer for noise control and temperature management. The secret is in the details: ventilation, sealing gaps, and targeted acoustic treatment turn a tiny space into a quiet, cool studio.
Think of your closet as a mini fortress—quiet on the outside, comfortable inside. When you get these elements right, you’ll wonder why you ever tolerated the noise in the first place.